Visual Studio configuration tips

This post describes how I have configured Visual Studio (2017 is the current version) to look and behave the way I want it to. Writing it down makes it easier for me to repeat the setup the next time I install Visual Studio on a new computer, but maybe someone else will find it useful as well.

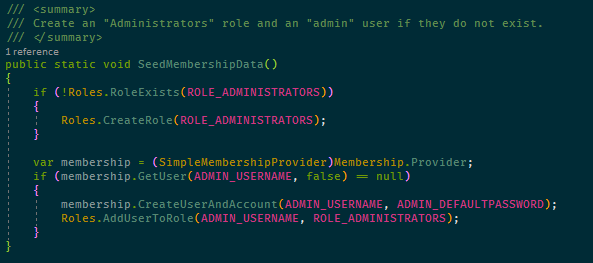
This is how a fragment of C# looks in my Visual Studio:
Color Theme

For years I have been using a color theme called Solarized Dark, of which there are many versions on the web and for many editors. I have modified a few colors but I think (but am not sure anymore) that the version I started with is this one: https://studiostyl.es/schemes/solarized-dark

I have exported my Fonts and Colors setting in Visual Studio to make them easy to reinstall, and this also includes the customized ReSharper colors (see below). Download here and use the Tools/Import and Export Settings… option in Visual Studio.

Font

The font I use is called Fira Code and supports programming ligatures which means that some combinations of characters are shown as custom symbols, such as in the lamba expression in this code fragment:

Fira Code can be downloaded directly from its GitHub repository: https://github.com/tonsky/FiraCode

Install it into Windows by downloading the contents of the distr/ttf folder and install the different variants of the font by right-clicking on them in the File Explorer and select Install in the context menu. Then go to Visual Studio’s Tools/Options menu option, to Environment/Fonts and Colors and select the font you want. I use the Fira Code Medium variant as it looked the best on my monitor.

Visual Studio Extensions

Setting the color theme and the font is still not enough to get the Visual Studio look the way I want. To go the whole way I also need two Visual Studio extensions: ReSharper and Viasfora.

ReSharper

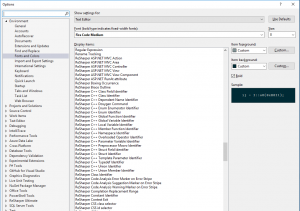
If you’re using Visual Studio for any serious work, chances are you’re already using ReSharper because of its very powerful coding tools such as the code suggestions and refactoring features. It also extends Visual Studio’s syntax highlighting with many more coloring rules. This can be seen in the Fonts and Colors dialog where these colors can be customized:

However, the coloring rules are not used unless ReSharper’s syntax coloring is enabled, as it’s disabled by default. The reason for this is probably that it does affect editing performance a little but if you have a powerful machine I think it’s worth enabling them. Not doing this leaves you with something like this:
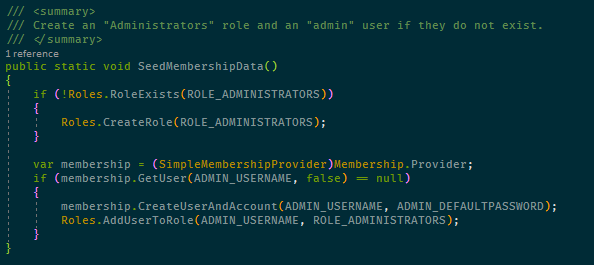
Compared to the example at the beginning of this post there are differences in that constants and methods are not colored, which I think they should be.

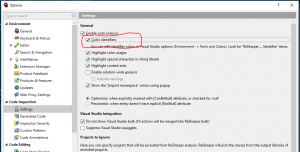
To enable the feature, go to ReSharper options and find the Code Inspection/Settings page and enable Color identifiers:

Since you’re already in ReSharper settings, you might also find it useful to enable the Use CamelHumps setting in Environment/Editor/Editor behavior. This is a feature which changes the definition of word delimiters when editing so that when moving the cursor to the next or previous word (Ctrl + Right/Left Arrow), it stops at upper case characters in camel cased symbols. Very useful for moving into long symbol names if you need to change something in the middle of them.

Viasfora

Viasfora is a fairly recent acquaintance of mine and I have found it useful to add the final coloring behaviors I want:

  • Rainbow parenthesis
    I didn’t know I needed it before I saw it, but now I find it very useful to have parenthesis and bracket pairs to have matching colors which are different from the colors of nested parentheses. Makes it much easier to see parenthesis mistakes when writing code. Visasfora has this feature and the colors it uses are customizable too.
  • Customizable colors for some keywords
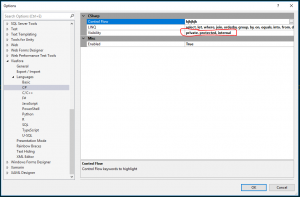
    It has for quite some time disturbed me that all visibility keywords in C# are colored the same. I really need private and public to be colored differently to make it easier to see the exposed surface of a class. Viasfora doesn’t exactly have this feature, but it does its own keyword coloring which will override Visual Studio’s built-in coloring. And its list of keywords is editable, so I can for example remove all keywords that I don’t want Viasfora to color and then set the color it uses to a discrete gray:
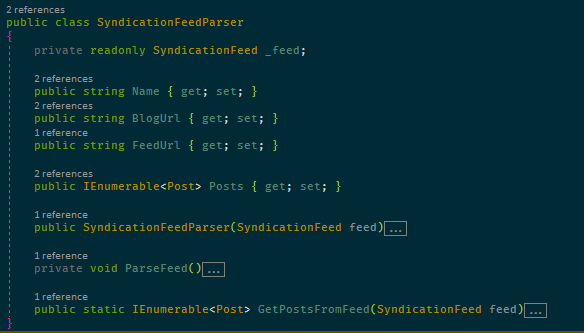
    This is the result and as you can see, it’s very easy to see the difference between public and private members:
Final comments

A lot of the above has to do with aesthetics but I don’t think it’s only about making the editing experience “look good”, which anyway is rather subjective. I firmly believe in minimizing the mental energy spent on interpreting and understanding code so that more energy can be put into solving the actual problems. With the changes above, I don’t have too look up symbols to see if they’re constants or enums or variables and it’s easy to see what methods are public. I think this makes me a little bit faster and my code a little bit better. That it’s nicer to look at the code is a bonus 🙂

Good luck with fiddling with configuration on your own, and feel free to post suggestions in the comments. Improving the development experience is a task I never expect to finish so new ideas are always welcome!

/Emil

Visual Studio slow? Try disabling hardware acceleration.

Ever since I got a new computer I’ve been frustrated by how slow Visual Studio 2013 has been. Granted, the computer is a little weak performance-wise, it’s of the Ultrabook type, but it’s been slow even at basic tasks such as moving the cursor around. Really strange.

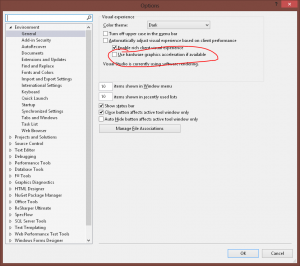
But after a tip from an article at Code Project I decided to disable hardware acceleration:

Disable hardware acceleration in Visual Studio 2013

Disable hardware acceleration in Visual Studio 2013

And what do you know, it worked! Moving around with the cursor keys in source code is now much more responsive and no longer a source of frustration. Oh joy!

/Emil

Exclude files and folders from Web Deployment projects

Getting a lot of garbage when compiling web deployment projects? Don’t worry, there’s an easy remedy!

This is how to do it (using Visual Studio):

  1. Check out the web deployment project.
  2. Right-click the deployment project in the Solution Explorer and select “Open Project File”. The project file will be opened in the built-in Xml editor.
  3. Insert Xml code similar to the following last in the file, just before the end tag for the Project element:
    <project>
      ...
      <ItemGroup>
        <ExcludeFromBuild Include="$(SourceWebPhysicalPath)\obj\**\*.*"/>
        <ExcludeFromBuild Include="$(SourceWebPhysicalPath)\Properties\**\*.*"/>
        <ExcludeFromBuild Include="$(SourceWebPhysicalPath)\**\*.csproj*"/>
        <ExcludeFromBuild Include="$(SourceWebPhysicalPath)\**\*.resx"/>
        <ExcludeFromBuild Include="$(SourceWebPhysicalPath)\**\*.Publish.xml"/>
      </ItemGroup>
    </project>
    
  4. After this change, all files matching the wildcard expressions given in ExcludeFromBuild elements will be excluded. Problem fixed!

Good luck deploying!

Update: The double asterisks means that the path matching is done recursively in the file system. For example, to exclude everything from the “obj\” folder we have to use “obj\**\*.*” since “obj\*.*” only matches files placed directly in the folder. Files in sub-folders would not be excluded if we used that pattern.

/Emil

Conditional Visual Studio build event scripts

In some projects there’s a need for manual operations after compilation. It might be to copy files, sign code or whatever. Of course it would be great to make these operations automatic, and that’s what build event scripts in Visual Studio are for.

Basically a build event script is a BAT file with some variables that are replace by Visual Studio when executing it. You create a build event script in the Properties dialog box of the project and here’s an example of what it may look like (in this case we package a set of files from the project into a Zip archive used for deploying the application):

REM If Debug config, do nothing...
if $(ConfigurationName) == Debug then goto endif

mkdir $(TargetDir)Imports\
mkdir $(TargetDir)Reports\
mkdir $(TargetDir)Faktureringsunderlag\

del /F /Q $(TargetDir)Imports\*.*
del /F /Q $(TargetDir)Reports\*.*
del /F /Q $(TargetDir)Faktureringsunderlag\*.*

copy /Y $(ProjectDir)Imports\*.xlt $(TargetDir)Imports\
copy /Y $(ProjectDir)Reports\*.rpt $(TargetDir)Reports\
copy /Y $(ProjectDir)Faktureringsunderlag\*.xlt $(TargetDir)Faktureringsunderlag\

REM Create Zip archive
del /Q SFI_old.zip
ren SFI.zip SFI_old.zip

$(SolutionDir)Utils\7z.exe a SFI.zip Faktureringsunderlag Imports Reports
ErrorHandler.dll janus*.dll Microsoft.ApplicationBlocks.Data.dll new_*.dll
new_SFIStarter.exe SFI*.dll Svea.exe Svea.exe.config

:endif

The example illustrates several points:

  • The operations are conditional, i.e. are not done in Debug compilation. There’s no point it taking that time if we’re about to deploy the application.
  • It makes sense to use options for the respective tool to disable prompting (e.g. “Are you sure you want to delete XXX”) since we’ll never be able to answer.
  • Any command line utility can be used. In this case I have downloaded the great 7-Zip util and copied it’s binaries into the solution so that it’s always available on every developer’s computer.

Kind of useful, ain’t it? Of course, there are other ways of doing this, e.g. using MSBuild, but I find this method easy to understand and manage.

Refresh Visual Studio Add-in settings

Here are some steps to try if you’re having problems with addins in Visual Studio (for example if toolbars or menus have vanished, or have been duplicated).

First, close all Visual Studio instances.

Then open a command line console with Visual Studio settings (e.g. “Visual Studio 2005 Command Prompt” from the start menu) and type:

devenv /resetaddin *

That line will clear the settings for all addins and cause them to refresh menus and toolbars the next time Visual Studio is started. To do that with an individual add-in, which requires knowing its class name, including namespace, type

devenv /resetaddin CodeAssist.Connect

If the above does not help, then try this (NOTE: This will delete all customization done to Visual Studio, such as keyboard mappings, etc!):

devenv /resetsettings
devenv /resetaddin *

When starting Visual Studio, you should now face a fresh and clean environment.

Get IWin32Window for the main window of Visual Studio

This is a way to wrap the main window of Visual Studio in a klass that implements the IWin32Window interface.

Public Class MainWinWrapper
    Implements System.Windows.Forms.IWin32Window
    Overridable ReadOnly Property Handle() As System.IntPtr _
            Implements System.Windows.Forms.IWin32Window.Handle
        Get
            Dim iptr As New System.IntPtr(DTE.MainWindow.HWnd)
            Return iptr
        End Get
    End Property
End Class

This is useful for example when Visual Studio should be used as the owner of a MessageBox.

Dim res As DialogResult
res = MessageBox.Show(New MainWinWrapper(), "Hello!")

The code was found here.

Auto-expanding custom (and standard) types in the watch window

The default for complex types is to just display the type name in the debugger’s watch window. Some system types however display the values of one or more properties instead of the type name. What is displayed is configurable which also makes it possible to show more information about user-defined types. This is how it’s done:

  1. Edit C:\Program Files\Microsoft Visual Studio .NET 2003\Common7\Packages\Debugger\mcee_cs.dat for C#, mcee_mc.dat for managed C++, vjsee.dat for J#. Sorry, no VB!
  2. Add/modify rows in the file. Each row describes how a type should be displayed. Example:
    &lt;System.DateTime&gt;=&lt;Year&gt;-&lt;Month&gt;-&lt;Day&gt; &lt;Hour&gt;:&lt;Minute&gt;:&lt;Second&gt;
  3. The first part is the type name, followed by ‘=’. The rest of the line contains property names surrounded with ‘< ' and '>‘, mixed with fixed text that is displayed as it is.

The example above will display DateTime values as "{2005-4-23 16:2:51}".

In addition to property names, one can also use expressions and method names.