This is a handy tip for removing (or lessening) haze from an image using the unsharp mask filter found in most image editing programs. Normally that filter is used for sharpening an image, but it has more uses…
Here’s an image of the Chrysler Building in New York (taken from the Empire State Building if you’re curious). It was a hazy day when I took the picture so the image low contrast:
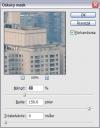
This haze can be fixed using the Unsharp mask filter. The dialog looks like this in Photoshop Elements 5:
I use the following values:
- Amount: 40
- Radius: 150
- Threshold: 0
The resulting image is much better:
As hazy images are almost inevitable when shooting outside with long distances, I thought this might make a good tip. BTW, I first saw it in a Swedish Photo mag called “DigitalFoto för alla”.
/Emil


