Bitwise operators in T-SQL?

You won’t need them very often but it might be good to know that they’re there. Here’s an example of how to use a bitwise AND in a where clause:

SELECT * FROM uppdrag WHERE (applikationer & 1) > 0

In this example, ‘applikationer’ is a column containing several combined flags and we want to check the setting on the flag in the lowest bit.

The bitwise operators are:

  • & – bitwise AND
  • | – bitwise OR
  • ^ – bitwise EXCLUSIVE OR

Zune Desktop Theme for Windows XP

Tired of your old Windows XP theme? Can’t decide which color scheme is the least ugly (blue, olive green or silver)?

Then why not try the Zune Desktop Theme for Windows XP? It’s designed to resemble the look of the Zune player, so I suppose its purpose is to inspire an interest in that device. Still, it looks quite good if you ask me:

zunetheme_crop

If you’re interested, download the theme here:

http://go.microsoft.com/fwlink/?LinkID=75078

Easy way to create temporary tables in SQL Server

Have you ever had a need to create temporary database tables in a SQL Server session or procedure? Are you used to creating them by hand like this:

CREATE TABLE #tmp
( 
    id INT, 
    name VARCHAR(32) 
)

Depending on what you need the table for, then there might be an easier way. Have a look at this short session:

SELECT * INTO mytemptable FROM foobar
SELECT * FROM mytemptable
DROP TABLE mytemptable

The first line creates a new temporary table based on the result set of a SELECT query, and stores the result set in the table. The query can be more complex than in the example, with JOINs, WHERE clauses etc. Incredibly useful when mangling and transforming data!

Exclude files and folders from Web Deployment projects

Getting a lot of garbage when compiling web deployment projects? Don’t worry, there’s an easy remedy!

This is how to do it (using Visual Studio):

  1. Check out the web deployment project.
  2. Right-click the deployment project in the Solution Explorer and select “Open Project File”. The project file will be opened in the built-in Xml editor.
  3. Insert Xml code similar to the following last in the file, just before the end tag for the Project element:
    <project>
      ...
      <ItemGroup>
        <ExcludeFromBuild Include="$(SourceWebPhysicalPath)\obj\**\*.*"/>
        <ExcludeFromBuild Include="$(SourceWebPhysicalPath)\Properties\**\*.*"/>
        <ExcludeFromBuild Include="$(SourceWebPhysicalPath)\**\*.csproj*"/>
        <ExcludeFromBuild Include="$(SourceWebPhysicalPath)\**\*.resx"/>
        <ExcludeFromBuild Include="$(SourceWebPhysicalPath)\**\*.Publish.xml"/>
      </ItemGroup>
    </project>
    
  4. After this change, all files matching the wildcard expressions given in ExcludeFromBuild elements will be excluded. Problem fixed!

Good luck deploying!

Update: The double asterisks means that the path matching is done recursively in the file system. For example, to exclude everything from the “obj\” folder we have to use “obj\**\*.*” since “obj\*.*” only matches files placed directly in the folder. Files in sub-folders would not be excluded if we used that pattern.

/Emil

Conditional Visual Studio build event scripts

In some projects there’s a need for manual operations after compilation. It might be to copy files, sign code or whatever. Of course it would be great to make these operations automatic, and that’s what build event scripts in Visual Studio are for.

Basically a build event script is a BAT file with some variables that are replace by Visual Studio when executing it. You create a build event script in the Properties dialog box of the project and here’s an example of what it may look like (in this case we package a set of files from the project into a Zip archive used for deploying the application):

REM If Debug config, do nothing...
if $(ConfigurationName) == Debug then goto endif

mkdir $(TargetDir)Imports\
mkdir $(TargetDir)Reports\
mkdir $(TargetDir)Faktureringsunderlag\

del /F /Q $(TargetDir)Imports\*.*
del /F /Q $(TargetDir)Reports\*.*
del /F /Q $(TargetDir)Faktureringsunderlag\*.*

copy /Y $(ProjectDir)Imports\*.xlt $(TargetDir)Imports\
copy /Y $(ProjectDir)Reports\*.rpt $(TargetDir)Reports\
copy /Y $(ProjectDir)Faktureringsunderlag\*.xlt $(TargetDir)Faktureringsunderlag\

REM Create Zip archive
del /Q SFI_old.zip
ren SFI.zip SFI_old.zip

$(SolutionDir)Utils\7z.exe a SFI.zip Faktureringsunderlag Imports Reports
ErrorHandler.dll janus*.dll Microsoft.ApplicationBlocks.Data.dll new_*.dll
new_SFIStarter.exe SFI*.dll Svea.exe Svea.exe.config

:endif

The example illustrates several points:

  • The operations are conditional, i.e. are not done in Debug compilation. There’s no point it taking that time if we’re about to deploy the application.
  • It makes sense to use options for the respective tool to disable prompting (e.g. “Are you sure you want to delete XXX”) since we’ll never be able to answer.
  • Any command line utility can be used. In this case I have downloaded the great 7-Zip util and copied it’s binaries into the solution so that it’s always available on every developer’s computer.

Kind of useful, ain’t it? Of course, there are other ways of doing this, e.g. using MSBuild, but I find this method easy to understand and manage.

Windows hibernation problems – solved!

Do you use the hibernation feature of Windows? Ever had any problems with it? I suspect that the answers to these two questions generally are the same…

Firstly, if you’re using Windows XP and have more than 2 GB of RAM, it doesn’t work. Fortunately there’s a fix. For more info, see here.

Secondly, you’re likely to have run into a host of other problems. My experiences include:

  • Hibernation works, but the computer is immediately awakened
  • Instead of hibernating, the computer is turned off
  • Instead of hibernating, I’m logged out to the welcome screen

All these are extremely irritating, of course. Fortunately I’ve found a solution to all my problems so far, namely a little known but excellent free tool called MCE Standby tool (MST) that helps you configure the hibernation options. If you have similar problems to mine, give it a go!

When you install the tool, it puts a small, green “power” icon in the system tray:

To configure the hibernation options, right-click the system tray icon, and the main window is displayed:
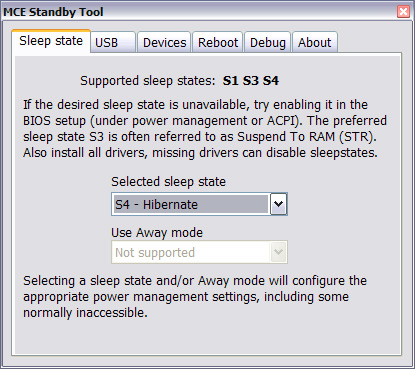
To fix my two last problems above, I changed Selected sleep state to “S3”, restarted the computer (might be unnecessary) and then changed back to “S4”. Voilá, problems gone.

If you have problems with the computer awakening immediately after hibernation then it might be a USB-connected device that’s waking the computer up (a mouse, keyboard, remote control receiver, etc). To fix this, you can select which deviced should be allowed to wake the computer up and this is done in the Devices tab:
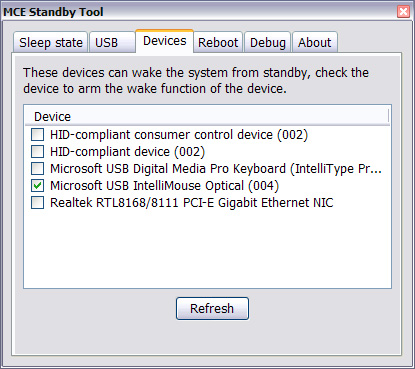
Deselect all devices you suspect to be causing problems, and no awakening should occur. For me it was my keyboard.

There are more options in the useful little tool, but these are the ones that helped me so far. Give it a try if you have similar problems!

/Emil

BTW, “MCE” in the tools name stands for “Media Center Edition” indicating that hibernation problems can often be related to media systems. And indeed, many of my problems started after I installed Media Portal. My advice concerning that system is of course to keep away from it…

Retrieving the computer domain namne

This is how to retrieve the full domain name of the current computer:

public static string GetFullComputerName()
{
  ManagementObject cs;
  using (cs = new ManagementObject("Win32_ComputerSystem.Name='" +
      Environment.MachineName + "'"))
  {
    cs.Get();
    return String.Format("{0}.{1}", Environment.MachineName, cs["domain"]);
  }
}

To make this work, you need a reference to System.Management.dll.

The result will be something like:

active99.i.activesolution.se

If anyone has a better approach, please leave a comment 🙂

/Emil

Installing the client tools for SQL Server

I’m back now from my parental leave, so here’s the first posting in a while…

Ever installed SQL Server forgetting to install the client tools such as Management Studio, Profiler, etc? Here’s how to install them the easiest way.

Instead of running the main installation program, which may or may not work, run [drive]:\SQL Server x86\Tools\Setup\SqlRun_Tools.msi to install the tools directly. Much quicker and we’re not depending on updates made to SQL Server since the installation.

Tip found here.

/Emil