This post describes how to write a simple Excel macro to create sequential id numbers. This can be useful whenever you create lists with rows that should have a unique id, for example in product backlogs, requirement lists, etc. Often you type these ids by hand, the first starting with 1 and then increasing the id for each consecutive row. This works okay as long as the rows are in the original order but when sorting and filtering is used it can be a little difficult to know what the next row id should be. You can always select all existing ids and look at Excel’s status row which is the highest but it would be nice to automate this, yes? Yes! 🙂
This is the result we’re aiming for:
To meet this goal, I have created a simple Excel macro that calculates the next id and this post describes how to use it.
First of all, make sure that the Developer Tab is enabled in the Ribbon:
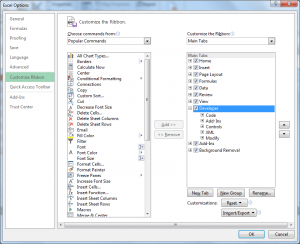
If it’s not, then enable it in the Customize Ribbon section of Excel’s Options dialog:
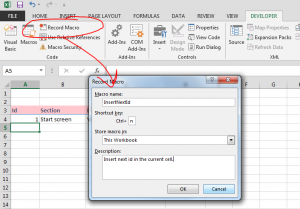
Once the Developer bar is enabled, start to create a new macro by clicking on the Record Macro button and fill in the fields:
Close the dialog and immediately stop recording the macro by clicking the same button again (it now says Stop Recording).
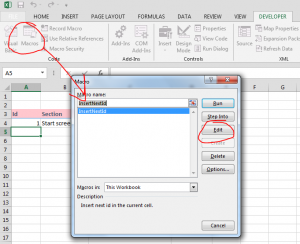
Then click the Macros button and edit the newly created macro by clicking the Edit button:
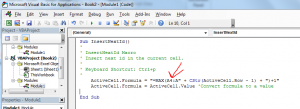
The empty source code for the new macro is displayed. Paste the following code into the macro:
ActiveCell.Formula = "=MAX(A4:A" + CStr(ActiveCell.Row - 1) + ")+1"
ActiveCell.Formula = ActiveCell.Value 'Convert formula to a value
Adjust the area so it suits the table. In the example the id column is A and the first row with data is row 4, so the area is given as A4:A. Close the macro dialog and you’re done!
Try the macro by placing the cursor in the id column of the first empty row and press the keyboard shortcut you selected when you created the macro (Ctrl-N in my case) and the new id should turn up. No more counting of rows or selecting all rows to see what the highest number is, we have now automated this process, and again there is some rest to be had for our lazy soul… 😉
Note that the Excel workbook must be saved with the .xlsm extension (Excel Macro-Enabled Workbook) for security reasons as macros are considered riskful by Microsoft:
/Emil


